こんにちは、もがちゃんです。
今回は、C言語で文字列のコピーを行う際に良く使用するstrcpyの使い方を簡単なサンプルソースとともに説明します。
目次
strcpyの構文
#include <string.h>
char *strcpy(char* restrict s1, const char* restrict s2);
strcpyの説明
strcpyは、s2で指定されたポインタが指す文字列をs1で指定されたポインタが指すメモリ領域へコピーします。文字列の終端文字(’\0’)もコピーします。
strcpy関数は、s2が指す文字列(終端ナル文字を含む。)をs1が指す配列にコピーする。領域の重なり合うオブジェクト間でコピーが行われるとき、その動作は未定義とする。
JISX3010 プログラム言語C
s1
コピー先メモリ領域の先頭を指すポインタを指定します。
コピー先のメモリ領域としてコピー元文字列(終端文字を含む)が格納できるだけの十分なサイズの領域が必要です。
s2
コピー元文字列の先頭を指すポインタを指定します。
文字列の終端文字としてNULL文字(’\0’)が必要です。
返却値
s1を返します。
strcpyの使い方サンプル
strcpyを使った簡単なサンプルプログラムとその実行結果を紹介します。
サンプルプログラムとその実行結果

strcpyの使い方サンプルプログラムの実行結果 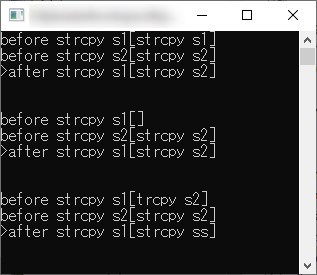
Windows10でstrcpyの使い方サンプルプログラムを実行した結果
#include <stdio.h>
#include <string.h>

int main(void) {
    char buffer1[10];
    char buffer2[10];
    char buffer3[20];    /* 重複する領域用 */

    memcpy(buffer1, "strcpy s1", strlen("strcpy s1")+1);
    memcpy(buffer2, "strcpy s2", strlen("strcpy s2")+1);

    /* 重複しない領域へのcopy */
    char* restrict s1 = buffer1;
    char* restrict s2 = buffer2;

    /* s2 -> s1へコピー */
    fprintf(stdout, "before strcpy s1[%s]\n", s1);
    fprintf(stdout, "before strcpy s2[%s]\n", s2);
    fprintf(stdout, ">after strcpy s1[%s]\n", strcpy(s1, s2));

    /* 重複する領域へのcopy その1 */
    memset(buffer3, '#include <stdio.h>
#include <string.h>
int main(void) {
char buffer1[10];
char buffer2[10];
char buffer3[20];    /* 重複する領域用 */
memcpy(buffer1, "strcpy s1", strlen("strcpy s1")+1);
memcpy(buffer2, "strcpy s2", strlen("strcpy s2")+1);
/* 重複しない領域へのcopy */
char* restrict s1 = buffer1;
char* restrict s2 = buffer2;
/* s2 -> s1へコピー */
fprintf(stdout, "before strcpy s1[%s]\n", s1);
fprintf(stdout, "before strcpy s2[%s]\n", s2);
fprintf(stdout, ">after strcpy s1[%s]\n", strcpy(s1, s2));
/* 重複する領域へのcopy その1 */
memset(buffer3, '\0', sizeof(buffer3));
s1 = &buffer3[0];
s2 = &buffer3[1];
fprintf(stdout, "\n\n");
/* s2 -> s1へコピー */
strcpy(s1, "");
strcpy(s2, "strcpy s2");
fprintf(stdout, "before strcpy s1[%s]\n", s1);
fprintf(stdout, "before strcpy s2[%s]\n", s2);
fprintf(stdout, ">after strcpy s1[%s]\n", strcpy(s1, s2));
/* 重複する領域へのcopy その2 */
memset(buffer3, '\0', sizeof(buffer3));
s1 = &buffer3[1];
s2 = &buffer3[0];
fprintf(stdout, "\n\n");
/* s2 -> s1へコピー */
strcpy(s1, "");
strcpy(s2, "strcpy s2");
fprintf(stdout, "before strcpy s1[%s]\n", s1);
fprintf(stdout, "before strcpy s2[%s]\n", s2);
fprintf(stdout, ">after strcpy s1[%s]\n", strcpy(s1, s2));
}
', sizeof(buffer3));
    s1 = &buffer3[0];
    s2 = &buffer3[1];

    fprintf(stdout, "\n\n");

    /* s2 -> s1へコピー */
    strcpy(s1, "");
    strcpy(s2, "strcpy s2");
    fprintf(stdout, "before strcpy s1[%s]\n", s1);
    fprintf(stdout, "before strcpy s2[%s]\n", s2);
    fprintf(stdout, ">after strcpy s1[%s]\n", strcpy(s1, s2));

    /* 重複する領域へのcopy その2 */
    memset(buffer3, '#include <stdio.h>
#include <string.h>
int main(void) {
char buffer1[10];
char buffer2[10];
char buffer3[20];    /* 重複する領域用 */
memcpy(buffer1, "strcpy s1", strlen("strcpy s1")+1);
memcpy(buffer2, "strcpy s2", strlen("strcpy s2")+1);
/* 重複しない領域へのcopy */
char* restrict s1 = buffer1;
char* restrict s2 = buffer2;
/* s2 -> s1へコピー */
fprintf(stdout, "before strcpy s1[%s]\n", s1);
fprintf(stdout, "before strcpy s2[%s]\n", s2);
fprintf(stdout, ">after strcpy s1[%s]\n", strcpy(s1, s2));
/* 重複する領域へのcopy その1 */
memset(buffer3, '\0', sizeof(buffer3));
s1 = &buffer3[0];
s2 = &buffer3[1];
fprintf(stdout, "\n\n");
/* s2 -> s1へコピー */
strcpy(s1, "");
strcpy(s2, "strcpy s2");
fprintf(stdout, "before strcpy s1[%s]\n", s1);
fprintf(stdout, "before strcpy s2[%s]\n", s2);
fprintf(stdout, ">after strcpy s1[%s]\n", strcpy(s1, s2));
/* 重複する領域へのcopy その2 */
memset(buffer3, '\0', sizeof(buffer3));
s1 = &buffer3[1];
s2 = &buffer3[0];
fprintf(stdout, "\n\n");
/* s2 -> s1へコピー */
strcpy(s1, "");
strcpy(s2, "strcpy s2");
fprintf(stdout, "before strcpy s1[%s]\n", s1);
fprintf(stdout, "before strcpy s2[%s]\n", s2);
fprintf(stdout, ">after strcpy s1[%s]\n", strcpy(s1, s2));
}
', sizeof(buffer3));
    s1 = &buffer3[1];
    s2 = &buffer3[0];

    fprintf(stdout, "\n\n");

    /* s2 -> s1へコピー */
    strcpy(s1, "");
    strcpy(s2, "strcpy s2");
    fprintf(stdout, "before strcpy s1[%s]\n", s1);
    fprintf(stdout, "before strcpy s2[%s]\n", s2);
    fprintf(stdout, ">after strcpy s1[%s]\n", strcpy(s1, s2));
}
サンプルプログラムを実行した環境(Play with Docker)では、重複する領域へのcopy その2のパターンでは、セグメント例外(Segmentation fault)が発生してコピーが実行できませんでした。
ちなみに、Windows10上でeclipseを使用して実行した場合は、以下のようになりました。
重複する領域へのcopy その2のパターンでは、エラーが発生はしませんでしたがコピーした結果がおかしくなってますね。(重複する領域の場合の動作は未定義なのでこれはこれで正しい動作)
strcpyの使い方まとめ
- s1のポインタが指すメモリ領域は、コピー元の文字列(終端文字を含む)が格納できるだけの十分な領域が必要。
- s2のポインタが指すコピー元文字列には、終端文字(’\0’)が必要。
- s1、s2のポインタが指すメモリ領域は、重複しない領域を指定しなければならない。